Accessible controllers open console gaming to players with limited mobility, one-handed setups, or specific dexterity needs. Instead of forcing a standard gamepad, adaptive systems let you map buttons to large pads, foot switches, sip-and-puff inputs and custom mounts. Here is how the main approaches compare and what to look for when building an accessible setup.
As an Amazon Associate we earn from qualifying purchases at no extra cost to you.


Our Top Picks


Top 3 picks at a glance
How adaptive controllers work
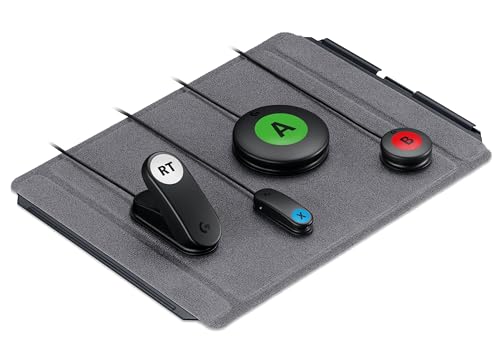
Most modern adaptive systems act as a hub: a central unit connects to the console and exposes 3.5 mm jacks or USB ports where you plug in external switches, buttons and joysticks. You then remap inputs in software so any physical button can trigger any in-game action. This modularity is what makes them so flexible.
| Approach | Best for | Typical cost range | Key strength |
|---|---|---|---|
| Hub-style adaptive controller | Custom multi-switch setups | $90-100 (hub) + accessories | Fully remappable, expandable |
| One-handed controller | Single-hand players | $150-300 | All inputs within one hand’s reach |
| Programmable pro controller | Remapping + back paddles | $130-200 | Paddles reduce finger travel |
| Software remapping only | Minor adjustments | Free (built in) | No extra hardware |
What to prioritize
Full button remapping
The most important feature is being able to reassign every action, including swapping stick and trigger functions. Console-level remapping (built into PS5 and Xbox accessibility menus) works alongside hardware so you can tune the whole layout to one hand or a set of large buttons.
Standard 3.5 mm and USB inputs
Look for a hub that uses common 3.5 mm switch jacks and USB, because that ecosystem of buttons, joysticks and mounts is huge and affordable. Proprietary-only connectors lock you into fewer, pricier accessories.
Mounting and stability
Adaptive play often needs the controller anchored to a wheelchair, desk or lap tray. AMPS-pattern mounting holes and compatibility with clamp arms let you position inputs precisely, which matters as much as the electronics.
Building a setup on a budget
Start with the hub controller (around $90-100), then add only the external switches you need — a couple of large buttons and a joystick can be enough. Console accessibility menus add copilot mode (two controllers acting as one), toggle for held buttons, and turbo, all free. This lets a helper assist without taking over.
Frequently asked questions
Do adaptive controllers work with any game?
Because they present themselves to the console as a standard controller, they work system-wide across virtually all games. Some fast titles may still be challenging, but remapping, hold-toggles and copilot mode dramatically widen what’s playable.
Can two controllers be combined for one player?
Yes. Copilot mode on Xbox and similar accessibility features let two controllers register as a single player, so a friend or caregiver can share inputs or a player can split controls across two hands or devices.
Software features that come free
Before spending on hardware, explore the accessibility menus already built into both major consoles. Button remapping, toggle-for-hold (so you don’t have to keep a button pressed), and adjustable stick sensitivity solve many challenges at zero cost. Speech-to-text, text-to-speech, high-contrast modes and controller-vibration options widen access further and stack with any hardware you add.
When you do buy, plan the layout around the player’s most reliable movements. Position the most-used actions (jump, fire, accelerate) on the largest, easiest-to-reach switches, and put situational actions on secondary inputs. Mounting is part of the design: clamp arms and trays let you place buttons exactly where a hand, foot, chin or elbow can reach them consistently. Because these systems present as standard controllers, a caregiver can also use copilot mode to assist during tricky sections without taking the game away from the player. Start minimal, live with the setup for a week, and add or reposition switches based on what actually causes fatigue or misfires — accessible setups improve through iteration, not by buying everything at once.
Bottom line
Start with a hub-style adaptive controller for maximum flexibility, choose one that uses standard 3.5 mm and USB inputs, and lean on the free console accessibility features for remapping, copilot and hold-toggles. Add mounts and only the external switches you actually need, and you can tailor a setup to almost any player.