If you own more than two game controllers, you already know the problem: someone leaves a controller face-down on the couch, the batteries die mid-session, and spare AA batteries cost more over a year than a charging dock ever will. Setting up a charging dock for multiple controllers sounds simple — plug it in, drop the controllers on — but doing it badly leads to real annoyances. Controllers get scratched by neighboring hard cases, cables sprawl behind your TV stand and collect dust, underpowered USB ports charge slowly or not at all, and a dock crammed on a cramped shelf tips over every time someone grabs a controller.
Done right, a charging dock becomes a single landing zone: controllers upright and visible, cables hidden, everything topped off before game night. This guide walks you through choosing a spot, setting up the dock, managing power and cables, and testing everything — with realistic time estimates so you know what you’re getting into. Expect the whole job to take 20 to 45 minutes depending on whether you mount anything or add cable management.
As an Amazon Associate we earn from qualifying purchases at no extra cost to you.

Our Top Picks


What You Need
| Item | Why | Optional? |
|---|---|---|
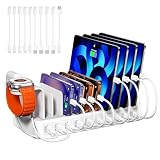
| Multi-port charging dock or station | The hub itself. Look for at least 4 USB ports if you have 3–4 controllers plus a headset or phone. Compact docks like the KDD 4-port station (about $21) combine controller and headset stands; larger organizers like a 10-port 100W dock (about $30) handle whole-family setups with adjustable dividers. | No |
| Charging cables or magnetic tips | Micro-USB for older controllers, USB-C for newer ones. Docks that include cables (the 10-port station ships with 10) save a separate purchase. | No (unless your dock has built-in cradles or pogo pins) |
| Power strip or surge protector | One wall outlet instead of five, and protection for everything plugged in. Choose one with at least 6 outlets and a low profile plug. | Recommended |
| Velcro straps or cable sleeve | Keeps cables from tangling behind furniture and makes the setup look intentional. | Yes |
| Adhesive cable clips | Routes cables along furniture edges so nothing hangs loose where it can be yanked. | Yes |
| Measuring tape | Confirms the dock fits your shelf. Many multi-device docks run 8–12 inches wide, 4–6 inches deep, and 3–5 inches tall with stands attached. | Yes |
| Microfiber cloth | Clean the shelf surface and controller charging ports before setup — dust in a USB-C port is the most common cause of “it won’t charge.” | Yes |
Step-by-Step
1. Count and audit your devices (5 minutes)
List every controller you want on the dock — Xbox, PlayStation, Switch Pro, third-party — plus anything else that’ll live there, like a wireless headset or phone. Note each device’s charging port type (USB-C, micro-USB, or proprietary). This determines how many ports and cables you actually need. A good rule: total ports should be at least two more than your controller count so you have room to grow.
2. Choose and measure the location (5 minutes)
Pick a surface within reach of an outlet: an open shelf under your TV, a side table, or a media console top. Measure the footprint. A compact 4-port dock with stands needs roughly 8 by 5 inches of surface; a 10-port organizer with dividers and a watch stand needs closer to 10 by 8 inches, plus clearance above for upright controllers (many stand 5 to 7 inches tall with a controller docked). Leave at least 2 inches behind the dock for cable bend radius. Avoid enclosed cabinets — heat builds up, and you’ll never see which controllers are charged.
3. Check your power budget (5 minutes)
Add up the wattage. Most controllers draw 5W to 10W each while charging (5V at 1–2A). A 10-port 100W station has ample headroom — roughly ten devices at full draw plus margin. A smaller 4-port dock typically delivers enough total output for four devices at once, but check the label: if a dock’s total output is under 20W and you plug in four devices, each one charges slowly. If you’re adding a phone or tablet, tablets can pull 18W or more, so a 100W-class station is the safer choice for mixed households.
4. Position and stabilize the dock (3 minutes)
Set the dock on the cleaned surface, stands and dividers attached. Weight matters here: lightweight docks under a pound can tip when someone yanks a controller, so route cables so a tug doesn’t pull the dock toward the edge. If the dock sits where kids or pets reach it, tuck it back at least 3 inches from the front edge or use a small strip of removable adhesive putty under the base.
5. Connect and label the cables (7 minutes)
Plug each charging cable into its port, then route the other end where each controller will sit. Label cable ends with small tags or colored tape if several controllers share the same connector — future-you will thank you. For docks with adjustable dividers, space them so each controller stands without touching its neighbor; touching plastic rubbing on plastic is how glossy controller shells get scuffed.
6. Plug in and manage the cables (5 minutes)
Connect the dock to the surge protector, then the surge protector to the wall. Bundle the slack with Velcro straps and run cables down the back of the furniture with adhesive clips. Nothing should dangle where a foot or vacuum can catch it.
7. Test each port (5–10 minutes)
Dock every device and confirm each one shows its charging indicator (a light on the controller or dock). Come back in 30 minutes and check again — a warm controller and an increased battery icon mean that port is delivering power. If a port shows no charge, swap cables before blaming the dock; the cable is the failure point far more often than the port.
8. Set your charging habit (2 minutes)
Pick a rule everyone can follow — for example, controllers return to the dock when the TV turns off. Docks work only if docking is automatic, so make it the default parking spot, not a special occasion.
Mistakes to Avoid
- Buying too few ports. A 4-port dock serving four controllers plus a headset means something is always unplugged. Buy two ports beyond your current count.
- Ignoring total output. Ten ports sharing 30W means slow charging across the board. Look for 60W–100W total output if you’ll charge six or more devices.
- Blocking ventilation. Charging controllers generate mild heat. Don’t sandwich the dock between a console and a soundbar in a tight cabinet.
- Using worn cables. Frayed or bent cables fail to seat fully and charge intermittently. Replace any cable that needs to be wiggled to work.
- Cheaping out on surge protection. A $15 surge protector is cheap insurance for a dock and hundreds of dollars of controllers plugged into it.
- Leaving lithium batteries at 0% for weeks. Controllers stored fully dead can fall below recoverable voltage. Even in the off-season, top them up monthly.
How Often
Dock controllers after every session — the whole point is that charging is passive. Beyond that, do light maintenance monthly: wipe the dock and shelf with a microfiber cloth, check that cables are still seated, and confirm each port charges. Every 6 months, inspect cables for fraying and verify the surge protector’s indicator light is still lit (most surge protection wears out silently after a large spike or 3–5 years of use). If your household’s controller count changes — a new console at a birthday, a guest setup — revisit your port count rather than daisy-chaining extra chargers.
When to Call a Pro or Replace
There’s no plumbing or wiring here, so an electrician is only relevant if your problem is the outlet itself — an outlet that’s warm to the touch, trips the breaker, or only works when you jiggle the plug should be inspected by a licensed electrician before you hang a dock near it. Replace the dock if: any port stops delivering power entirely, the housing cracks or the stands wobble loose, it emits a burning smell or buzz (unplug it immediately), or the surge protector downstream of it shows a failed-protection indicator. Also consider replacing rather than repairing when your device mix changes significantly — a dock built around four micro-USB controllers has little future in a USB-C household, and by 2026 most new controllers and accessories will have made the switch.
FAQ
Can I leave controllers on the dock overnight?
Yes. Modern controllers and docks use charge management that stops or trickles once the battery is full, so overnight charging won’t damage the battery. Avoid leaving a controller docked for months untouched; a monthly top-up keeps lithium batteries healthy.
Will a multi-device dock charge controllers as fast as the console’s own cradle?
Usually yes, and often faster. Controllers typically accept 5W–10W, and a quality dock delivers that per port. The exception is heavily loaded low-wattage docks — if you plug six devices into a station with modest total output, charging slows for everyone.
Do I need special cables for Xbox, PlayStation, and Switch controllers?
No single special cable, but you need the right connector for each: newer Xbox, PlayStation, and Switch Pro controllers use USB-C, while older Xbox One and some third-party controllers use micro-USB. A dock that bundles multiple cable types, like 10-cable stations in the $30–$35 range, saves buying them separately.
How many controllers can one dock realistically handle?
A compact 4-port station with controller stands comfortably handles 3–4 controllers plus a headset. A 10-port, 100W organizer handles 8–10 devices if you have the shelf space — figure roughly 12 by 10 inches of surface and check that upright controllers fit under any shelf above with an inch to spare.
Related guides
- Best Free MMOs on Steam: Subscription Limits, Pay-to-Win and Time Cost (2026)
- Best Free Horror Games on Steam: How to Pick One That Fits Your PC and Your Nerves (2026)
- Black Frame Insertion vs VRR: Which Smoothness Feature Should You Use?
- Best Webcams for Streaming: 11 Listings Compared by Resolution, Focus and Light (2026)