Few things interrupt a great gaming session faster than picking up a controller only to realize the battery is completely flat. While plugging a cable directly into the front of your console works in a pinch, it leaves your entertainment center looking cluttered and restricts where you can sit. A dedicated charging dock is the ultimate solution for keeping your controllers organized, charged, and ready to go.
However, when shopping for this essential accessory, many gamers fall into common traps. They buy the cheapest generic stand online, only to find it is so light that it slides across the media console every time they try to dock a controller. Or, they buy a dock that lacks a dedicated wall adapter, meaning it only charges when the console is powered on or in Rest Mode—negating the convenience of a standalone charging station. To help you avoid these headaches, we have put together a comprehensive guide on what to look for in a ps5 charging dock so you can invest in a accessory that actually simplifies your gaming setup.
As an Amazon Associate we earn from qualifying purchases at no extra cost to you.


Our Top Picks

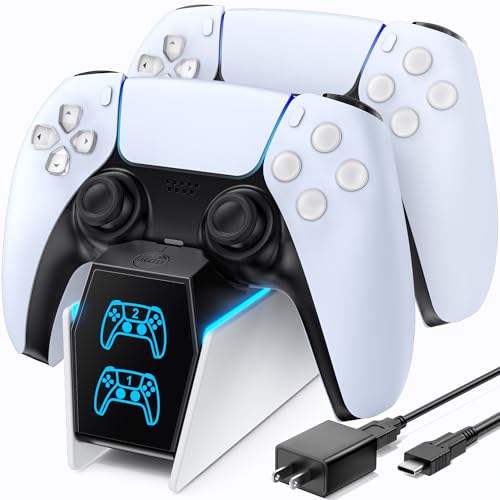


Top 3 picks at a glance
Decide These 3 Things First
Before diving into electrical specs and design details, you need to establish three basic parameters for your setup. Making these decisions upfront will instantly filter out half the options on the market.
- Single vs. Dual Controller Capacity: If you only own one controller and never plan on buying a second, a single-cradle stand (like the Razer Quick Charging Stand) saves space. However, if you play couch co-op or want to keep a backup controller fully charged so you can swap them out during marathon sessions, a dual-docking station is a must.
- Power Source (Wall Outlet vs. Console USB): Decide where the dock will draw its power. Docks powered by a dedicated AC wall adapter operate completely independently of your console. USB-powered docks must plug into your console’s USB ports, which can limit your placement options and consume precious ports needed for external hard drives or headsets.
- Visual Integration and Placement: Determine where this dock will live. Will it sit prominently on top of your media console next to the console, or will it be tucked away inside a cabinet? If it is front and center, you will want to match the exact white and black aesthetic of the console. If it is hidden, raw utility and a small footprint are your main priorities.
Size and Footprint
A charging dock should save space, not hog it. The physical dimensions of the dock dictate where it can live on your desk or media console. A standard dual-controller charging station typically measures between 2.2 to 2.8 inches wide, 6.0 to 7.0 inches long, and 2.0 to 2.5 inches tall. This compact footprint allows it to sit neatly alongside your console or behind your television.
Beyond dimensions, pay close attention to the unit’s weight. Many budget docks weigh under 100 grams (3.5 ounces). Because they are so light, they lack the physical stability required for smooth docking. When you try to pull a controller off the dock, the entire station lifts with it, requiring you to use two hands. Look for a dock that weighs at least 150 to 250 grams (5.3 to 8.8 ounces), or one that features a weighted metal base plate. This added heft, combined with high-friction silicone rubber feet on the bottom, ensures the dock stays firmly planted on your table when you grab your controller.
Material and Construction
Since this accessory will sit in your living room or office, its build quality matters. Most charging docks are constructed from ABS (Acrylonitrile Butadiene Styrene) plastic. However, the grade of plastic varies wildly. High-quality docks use thick-walled, injection-molded ABS with a matte finish that matches the texture of the console’s outer shell. Cheap docks use thin, glossy plastic that flexes under pressure, attracts fingerprints, and scratches easily.
The most critical wear point on any dock is the contact mechanism. Look for docks that feature gold-plated or high-grade copper contact pins. These materials offer excellent electrical conductivity and resist corrosion over time. The pins should be spring-loaded with a smooth, tactile travel. If the springs are too stiff, the controller won’t sit flat; if they are too soft, the connection will be intermittent, leaving you with an uncharged controller when you least expect it.
Power, Speed, and Performance
When analyzing what to look for in a ps5 charging dock, charging speed is paramount. The standard DualSense wireless controller is equipped with a 1,560 mAh lithium-ion battery. To charge this battery efficiently, the dock must deliver the correct voltage and amperage.
A high-performing dock should fully charge one or two dead controllers in approximately 2.5 to 3 hours. To achieve this speed for two controllers simultaneously, the dock requires an input rating of at least 5V/2A (10 watts) to 5V/3A (15 watts). If a dual dock relies on a standard USB-A to USB-C cable plugged into a standard 5V/1A USB port, it simply cannot draw enough power to charge both controllers quickly, often stretching charge times to 5 hours or more. Always check the product specifications for the output per cradle; it should ideally be 5V/1.0A or 5V/1.5A per controller.
Docking Mechanism and Ease of Use
There are two primary ways a controller connects to a charging dock: through the top USB-C port, or through the bottom EXT port and headphone jack contacts. This design choice dramatically affects daily usability.
We highly recommend docks that utilize the bottom EXT port (like the official Sony station and the PowerA Twin Charging Station). This design is often called “drop-and-charge.” You simply lower the controller onto the cradle, and gravity guides the bottom metal contacts onto the dock’s spring-loaded pins. It is intuitive, requires zero alignment effort, and can easily be done with one hand in the dark.
Conversely, avoid docks that feature a protruding male USB-C plug pointing upward. These require you to manually align the tiny USB-C port on the top of the controller with the plug on the dock. This setup is clumsy, often requires two hands, and will inevitably lead to unsightly scratches around your controller’s port over months of use.
Price Tiers: What You Actually Get
Understanding what your money buys in the charging dock market will help you set a realistic budget. Price points generally fall into three distinct tiers:
- Budget ($10 to $18): In this entry-level tier, you will find mostly generic brands. These docks are lightweight, often lack an included wall adapter (providing only a USB cable), and frequently use the less desirable USB-C plug-in mechanism. While they get the job done, they require more effort to dock and take longer to charge.
- Mid-Range ($19 to $29): This is the sweet spot for the vast majority of gamers. In this tier, you find officially licensed products (like the PowerA Twin) and highly-rated third-party options (like OIVO). These units almost always feature drop-and-charge bottom contacts, weighted bases, LED charge indicator lights, and built-in smart chips to prevent overcharging. Some even include their own dedicated AC fast-charging wall adapters.
- Premium ($30 to $45+): Premium docks, such as the Razer Quick Charging Stand or specialized multi-functional organizer hubs, offer specialized aesthetics and ultra-fast charging. They feature high-end paint finishes designed to match specific controller colorways, magnetic alignment cradles, and advanced RGB ambient lighting. Looking ahead toward the gaming setups of 2026, keeping our entertainment centers cord-free and highly organized remains a top priority, making these premium, design-forward docks a worthy investment for modern living rooms.
Warranty and Brand Support
While a charging dock is a relatively simple accessory, it still deals with electrical currents and lithium-ion batteries. Buying from a reputable brand with solid customer support provides peace of mind. Look for manufacturers that offer at least a 12-month warranty. Premium brands often extend this to 24 months.
Furthermore, look for safety certifications on the packaging or product listing. A reputable dock should carry FCC, CE, and RoHS certifications. These markings guarantee that the device has been tested for safety standards, including over-current protection, over-voltage protection, and short-circuit protection, safeguarding your expensive controllers from electrical damage.
Spec Checklist
Use this quick reference table to compare what features you should expect at different price points when shopping for a dock.
| Feature / Spec | Budget Tier ($10 – $18) | Mid-Range Tier ($19 – $29) | Premium Tier ($30 – $45+) |
|---|---|---|---|
| Power Source | USB-A Cable (No Wall Adapter) | USB-C to USB-C or AC Wall Adapter | Dedicated High-Output AC Adapter |
| Charging Connection | Top USB-C Male Plug | Bottom EXT Contact Pins | Bottom EXT Pins / Magnetic Cradle |
| Charge Time (2 Controllers) | 4.0 to 5.5 Hours | 2.5 to 3.0 Hours | 2.0 to 2.5 Hours |
| Unit Weight | Under 100g (Very Light) | 150g to 220g (Stable) | 250g+ (Highly Weighted) |
| Safety Features | Basic Fuse | Smart Chip (Overcharge Protection) | Advanced Thermal & Overcurrent Chips |
Red Flags to Avoid
When browsing online marketplaces, keep an eye out for these warning signs that indicate a sub-par product:
- “USB-C Adapter Dongles Required”: Some cheap docks force you to plug a tiny USB-C dongle into your controller, which then slots into the dock. These dongles are easy to lose, look ugly on the controller, and can easily break off inside the port.
- No Mention of Smart Auto-Off: If a dock does not explicitly advertise “overcharge protection” or “auto-off when fully charged,” avoid it. Continuous trickle-charging after a battery is full can degrade your controller’s battery life over time.
- Super-Bright, Non-Dimmable LEDs: Many budget docks feature massive, blinding LED light bars to show charging status. If you keep your console in your bedroom, these cheap, ultra-bright lights can easily ruin your sleep environment. Look for docks with subtle, dim indicators or lights that turn off completely once charging is complete.
- Extremely Short Cables: Check the length of the included power cable. Many budget docks ship with a 2-foot or 3-foot cable, which severely limits where you can place the dock relative to your power outlet or console. Look for a minimum cable length of 4.5 to 6 feet.
FAQ
Can I leave my controller on the charging dock permanently?
Yes, provided you purchase a high-quality dock with an integrated smart chip. Modern, reputable charging stations feature overcharge protection that automatically stops delivering current once the controller’s battery reaches 100%. This prevents battery degradation and allows you to use the dock as a permanent storage stand.
Is it better to plug the charging dock into a wall outlet or the console?
A wall outlet is highly recommended. Plugging the dock into a wall outlet ensures your controllers charge even when your console is completely powered down. If you plug the dock into the console, you must configure your system settings to supply power to the USB ports during “Rest Mode,” and it will not charge at all if the console is fully turned off.
Will these charging docks work with the DualSense Edge controller?
Not all of them. The premium DualSense Edge controller has different physical dimensions, back paddles, and contact layouts compared to the standard controller. While the official Sony charging station is compatible with both the standard and Edge controllers, many third-party docks are designed tightly around the standard shell and will not fit the Edge. Always check the manufacturer’s compatibility list if you own the Edge.
Why is my charging dock flashing red?
A flashing red light typically indicates an error state. This most commonly happens if the controller is not seated correctly on the contact pins, preventing a clean electrical connection. It can also indicate that the power supply is not delivering enough wattage to the dock, or that the dock’s internal safety sensors have detected overheating. Try re-seating the controller or swapping to a more powerful wall adapter.
Related guides
- Best Free MMOs on Steam: Subscription Limits, Pay-to-Win and Time Cost (2026)
- Best Free Horror Games on Steam: How to Pick One That Fits Your PC and Your Nerves (2026)
- Black Frame Insertion vs VRR: Which Smoothness Feature Should You Use?
- Best Webcams for Streaming: 11 Listings Compared by Resolution, Focus and Light (2026)