Building a high-performance virtual reality (VR) rig is an exciting project, but it is easy to get lost in a sea of technical jargon. Many first-time builders make the critical mistake of focusing all their budget on the graphics card and processor, treating the motherboard as an afterthought. They buy a board based solely on a flashy “VR Ready” sticker on the box, only to discover later that their VR headset constantly disconnects, their system thermal-throttles, or they lack the physical ports needed to plug in all their tracking sensors.
When researching what to look for in a vr ready motherboard, you must look past the marketing hype. A motherboard does not directly render the virtual world, but it acts as the central nervous system of your entire build. If it cannot supply clean, stable power to your CPU, or if its onboard USB controllers get overwhelmed by the massive data streams of a modern VR headset, your immersive experience will quickly devolve into a stuttering, nauseating mess. To get the best performance, you need to understand which technical specifications actually impact virtual reality gameplay.
As an Amazon Associate we earn from qualifying purchases at no extra cost to you.


Our Top Picks


Top 3 picks at a glance
Decide These 3 Things First
Before diving into individual motherboard listings, you must establish the baseline parameters of your build. Answering these three questions immediately narrows down your options and prevents costly buying mistakes:
- Your Headset’s Connection Type: Are you using a tethered PCVR headset (like a Valve Index or Bigscreen Beyond) that requires dedicated DisplayPort and high-power USB connections, or a standalone hybrid headset (like a Meta Quest 3) that relies on a single high-speed USB-C link cable or high-bandwidth Wi-Fi?
- Your Case Size (Form Factor): Do you want a massive, expandable desktop tower, or a compact, portable console-style build that you can easily move to your living room for room-scale VR play?
- Your Upgrade Horizon: Are you building a system solely for today’s VR titles, or do you want a platform that can support next-generation graphics cards and processors without requiring a complete system rebuild a few years down the road?
1. Size and Form Factor
The physical size of your motherboard—known as its form factor—dictates the size of your PC case, the thermal performance of your system, and your capacity for future expansion. The three standard consumer form factors are ATX, Micro-ATX, and Mini-ITX.
An ATX motherboard measures 12 x 9.6 inches (305 x 244 mm) and typically weighs between 2.5 and 3.5 pounds. This is the gold standard for VR builds. The larger physical footprint provides ample spacing between the CPU socket and the primary PCIe slot, allowing you to install massive, triple-slot graphics cards and beefy dual-tower CPU air coolers without clearance issues. It also offers 4 to 7 expansion slots, giving you room to add dedicated USB PCIe expansion cards or wireless adapter cards.
A Micro-ATX (mATX) motherboard measures 9.6 x 9.6 inches (244 x 244 mm). It is a cost-effective middle ground, but the tighter layout means a giant graphics card may block your secondary PCIe slots or SATA ports.
A Mini-ITX motherboard is a tiny 6.7 x 6.7 inches (170 x 170 mm), weighing just 1.5 to 2 pounds. While highly portable for living room VR setups, Mini-ITX boards only have a single PCIe slot, two RAM slots, and limited fan headers. Thermals are also much harder to manage in Mini-ITX cases, which can lead to performance throttling during long VR sessions.
2. Material and Build Quality
VR gaming puts a sustained, heavy load on your hardware. Unlike traditional flat-screen gaming where frame rate dips are annoying, a frame drop in VR causes immediate physical motion sickness. Therefore, your motherboard must be constructed from premium materials that can handle heat and electrical stress over hours of continuous play.
Look for motherboards built with a 6-layer or 8-layer server-grade PCB (Printed Circuit Board). Cheaper motherboards use 4-layer PCBs, which are more prone to electrical interference and physical warping under the weight of heavy graphics cards and CPU coolers. High-quality PCBs use 2-ounce thickened copper traces, which improve signal integrity and help dissipate heat away from critical components.
Additionally, examine the physical reinforcement of the motherboard. The primary PCIe x16 slot (where your graphics card sits) should feature steel or metal shielding. Modern high-end graphics cards can weigh over 4 pounds; an unreinforced plastic PCIe slot can crack or sag under this weight, breaking the electrical connection mid-game.
3. VRM Power Delivery and Construction
The Voltage Regulator Module (VRM) is the unsung hero of a VR motherboard. The VRM steps down the 12V power from your power supply to the exact voltage (usually around 1.2V to 1.4V) required by your CPU. If the VRM runs too hot or lacks sufficient power phases, your CPU will automatically throttle its speed to protect itself, causing instant stuttering in your VR headset.
A motherboard’s VRM quality is determined by its phase design and component ratings:
- Phase Count: Look for a power phase design of at least 8+2 phases for mid-range builds, and 12+1+1 phases or higher for high-end systems. More phases distribute the electrical workload, meaning each individual phase runs cooler and lasts longer.
- Amperage Ratings: Premium motherboards use Smart Power Stages (SPS) rated for 60A, 80A, or even 105A. A higher amperage rating means the board can effortlessly supply clean power to power-hungry CPUs under heavy load.
- Heatsinks: Avoid motherboards with bare, exposed VRM transistors (MOSFETs). A VR-ready motherboard should feature heavy, grooved aluminum heatsinks (weighing at least 150 to 200 grams) clamped tightly over the VRMs with high-conductivity thermal pads (rated for 5 W/mK or higher).
4. Port Connectivity and High-Speed I/O
This is where many VR builders run into a brick wall. VR headsets are data monsters. They do not just receive video signals; they simultaneously send high-resolution tracking data, camera feeds, audio, and microphone signals back to your PC.
To support this data transfer, you need a robust selection of USB ports on the rear I/O panel. A proper VR-ready motherboard should have at least four USB 3.2 Gen 1 (5 Gbps) ports and at least two USB 3.2 Gen 2 (10 Gbps) ports. If you are using a Meta Quest headset via a Link Cable, you absolutely need a rear-panel USB-C port that supports USB 3.2 Gen 2×2 (20 Gbps) or USB4 (40 Gbps) with power delivery of at least 15W to keep the headset charged while you play.
Crucially, pay attention to the onboard USB controllers. Cheap motherboards route all their USB ports through a single controller chip. When you plug in a VR headset, two external tracking sensors, and your keyboard/mouse, you can easily overload that single controller’s bandwidth, causing your headset tracking to drift or disconnect. Higher-end motherboards utilize multiple dedicated USB controller chips to split the bandwidth load safely.
5. Price Tiers and Value Mapping
Motherboard pricing varies wildly, but you do not need to buy a flagship overclocking board to get a stellar VR experience. Here is how the market breaks down:
- Budget Tier ($100 – $160): These boards (typically using B-series chipsets) offer basic connectivity and standard 4-layer PCBs. They are suitable for entry-level VR setups using standalone headsets over Wi-Fi, but they lack the heavy VRM cooling and extensive high-speed USB ports required for high-end, tethered headsets.
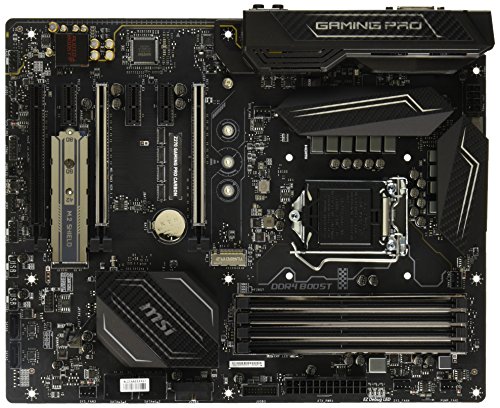
- Mid-Range Tier ($170 – $250): This is the sweet spot for the vast majority of VR gamers. Boards like the classic MSI Z270 Gaming PRO Carbon Motherboard ($190) or its modern chipset equivalents offer robust 6-layer PCBs, reinforced PCIe slots, excellent VRM heatsinks, and a generous array of USB 3.2 ports. They provide the perfect balance of stability and performance without paying for extreme overclocking features.
- Premium / Enthusiast Tier ($300 – $500+): Featuring top-of-the-line options like the MSI Enthusiastic Gaming Motherboards ($350+), this tier offers massive 16+2+1 power phases, server-grade 8-layer PCBs, integrated Wi-Fi 7, multiple dedicated USB controllers, and Thunderbolt 4 support. As we look toward 2026, these premium boards ensure your system is fully prepared for next-generation, ultra-high-resolution VR headsets that require massive bandwidth and pristine signal delivery.
6. Warranty and Customer Support
Because motherboards are complex electrical hubs, they have a higher return-and-failure rate than almost any other PC component. A solid warranty protects your investment if a USB port dies or a BIOS update goes wrong.
Standard budget motherboards usually come with a 2-year warranty. Mid-range and premium motherboards from reputable brands typically offer a 3-year or 5-year limited warranty.
When evaluating warranties, look at the manufacturer’s Return Merchandise Authorization (RMA) terms. Do they have local repair depots in your country, or will you have to ship a 3-pound package internationally at your own expense? Reputable brands often offer cross-shipping options (where they send you a replacement board before you send back the broken one), minimizing your VR downtime to just a few days rather than weeks.
7. Out-of-Box Assembly and Layout
The physical layout of the motherboard can make your PC assembly process a dream or a nightmare. When unboxing and installing your board, several design choices matter immensely:
- Integrated I/O Shield: Cheap motherboards come with a separate, sharp metal plate that you must snap into your computer case before mounting the motherboard. Premium boards feature a pre-installed, integrated I/O shield. This provides superior electromagnetic interference (EMI) protection and saves your fingers from nasty cuts.
- Fan and Pump Headers: VR systems generate massive heat. Your motherboard should have at least 5 to 8 individual 4-pin PWM fan headers, including a dedicated high-amperage (2A or 3A) water pump header if you plan to use an All-In-One (AIO) liquid CPU cooler.
- Clearance Zones: Check the spacing around the CPU socket. Ensure that tall RAM modules or VRM heatsinks do not physically block the mounting brackets for your chosen CPU cooler.
Spec Checklist
Use this quick-reference checklist to compare motherboard specifications across different price segments when shopping for your VR build:
| Feature / Spec | Budget ($100–$160) | Mid-Range ($170–$250) | Premium ($300+) |
|---|---|---|---|
| Form Factor Support | Micro-ATX / Entry ATX | Full ATX / Mini-ITX | E-ATX / Full ATX |
| PCB Layers | 4-Layer PCB | 6-Layer PCB | 8-Layer (Server-Grade) |
| VRM Power Phases | 6+2 or 8+1 Phases | 12+1+1 or 14+2 Phases | 16+2+1 to 24+2 Phases |
| Rear USB Ports | 4-6x USB (mostly Gen 1) | 8-10x USB (Mix of Gen 1 & Gen 2) | 10-12x USB (Gen 2, Gen 2×2, USB4) |
| PCIe Slot Reinforcement | Plastic (Unshielded) | Steel Armor (Primary Slot) | Full Metal Shielding (All Slots) |
| Onboard Audio Codec | Realtek ALC897 (Basic) | Realtek ALC1200 / ALC4080 | ESS SABRE DAC / Audiophile Grade |
| Wireless Connectivity | Wi-Fi 5 or None | Wi-Fi 6E (6 GHz Band) | Wi-Fi 7 / 10 Gbps Ethernet |
Red Flags
Avoid motherboards that exhibit any of these warning signs, as they are highly likely to cause issues with modern VR setups:
- No VRM Heatsinks: If you can see bare, exposed black square chips (MOSFETs) surrounding the CPU socket with no metal blocks covering them, skip the board. It will overheat and throttle your CPU during intense VR gameplay.
- Fewer than Four Rear USB Ports: VR headsets and their accompanying sensors require multiple connections. If a board only has 4 total USB ports on the back, you will run out of space instantly.
- No BIOS Flashback Button: If you buy a new CPU and an older motherboard, the system will not boot without a BIOS update. A “BIOS Flashback” button on the rear I/O allows you to update the motherboard firmware using a USB thumb drive without needing an older CPU installed.
- Unshielded Audio Circuitry: VR relies heavily on spatial 3D audio for immersion. Cheap motherboards lack physical isolation lines on the PCB for the audio components, which allows electromagnetic noise from your graphics card to leak into your headphones as a constant, annoying buzzing or whistling sound.
FAQ
Does “VR Ready” on a motherboard box actually mean anything?
Not really. “VR Ready” is largely a marketing label used by manufacturers to indicate that the motherboard meets the bare minimum hardware requirements (usually meaning it has at least one USB 3.0 port and a PCIe x16 slot). It does not guarantee high-quality power delivery, superior thermal management, or multiple dedicated USB controllers. You must look at the actual technical specifications rather than relying on box stickers.
How many USB ports do I actually need for a VR setup?
At an absolute minimum, you need one high-speed USB 3.0 (or newer) port for the headset itself. However, if you are using an older tracking system like the Oculus Rift CV1, you will need up to four USB ports (one for the headset and three for the tracking sensors). Additionally, you must account for your standard peripherals like your keyboard, mouse, microphone, and gamepads. A motherboard with at least 6 to 8 rear USB ports is highly recommended.
Do I need Wi-Fi on my motherboard if I use a VR headset?
If you use a tethered headset (like a Valve Index), you do not need Wi-Fi on your motherboard; a standard wired Ethernet connection is preferred for downloading games. However, if you use a standalone headset like the Meta Quest 3 or Pico 4 wirelessly via Air Link or Virtual Desktop, having an onboard Wi-Fi 6E or Wi-Fi 7 module is highly beneficial. These standards utilize the clean 6 GHz wireless band, providing the ultra-low latency and high bandwidth required for smooth wireless VR streaming.
Can a micro-ATX or mini-ITX motherboard handle high-end VR?
Yes, they can, but with caveats. High-quality mini-ITX and micro-ATX boards have excellent VRMs and can easily run flagship CPUs. However, because of their smaller sizes, they have fewer USB ports, fewer PCIe expansion slots, and much tighter physical clearance. You will need to plan your cooling system and cable management carefully to prevent heat buildup in a smaller chassis.