Few things disrupt the immersive flow of virtual reality faster than a sudden black screen, a frozen frame, or an abrupt kick back to your headset’s default dashboard. When you are deep into a highly detailed simulation, a creative design project, or an intense gaming session, a drop in your wired connection ruins the experience and breaks the workflow of your carefully curated tech setup.
If you handle this issue incorrectly—such as repeatedly yanking and re-inserting the cord, or blindly changing system registry files—you risk permanently damaging the delicate USB-C port on your headset. Furthermore, unstable connection drops can cause sudden screen stuttering, leading to severe virtual motion sickness. To keep your modern home gaming space clean, safe, and highly functional, learning how to troubleshoot meta quest link cable connection drops systematically is essential.
As an Amazon Associate we earn from qualifying purchases at no extra cost to you.

Our Top Picks


What You Need
Before diving into the software and hardware adjustments, gather the tools necessary to secure your physical connection and optimize your PC’s ports. Having the right physical supports prevents wear on both your premium VR headset and your computer’s motherboard.
| Item | Why It’s Needed | Optional? |
|---|---|---|
| High-Quality USB 3.0 Link Cable | Provides the minimum 5 Gbps data transfer rate and reliable power delivery required for continuous VR streaming. | No |
| Cable Management Strap (Velcro) | Relieves physical strain on the headset’s USB-C port, preventing connection drops caused by head movement. | No |
| Can of Compressed Air | Cleans out pocket lint, dust, and household debris from the headset and PC ports. | Yes |
| USB-C to USB-A Adapter (USB 3.0 rated) | Allows connection to high-speed USB-A ports if your PC lacks a dedicated, high-wattage USB-C port. | Yes |
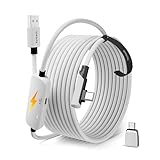
When selecting a cable, ensure it is built specifically for VR wear-and-tear. Durable options like the Syntech Link Cable 16FT, USB 3.0 to USB Cable for Meta Quest 3/3S/2, Pico 4 (retailing for approximately $16) or the Syntech 16FT VR Link Cable with USB 3.0 to C Adapter for Meta Quest 3S/3/2 (priced around $21) provide the necessary 16-foot length, lightweight flexibility, and robust shielding needed to prevent drops without weighing down your headset.
Step-by-Step
Follow these steps in order, starting with the simplest physical checks and moving toward advanced system configuration settings.
Step 1: Inspect and Clean the Physical Connections (Time: 5 Minutes)
Physical debris and port wear are the leading causes of intermittent connection drops. Because the headset is frequently handled and stored in open rooms, the USB-C port acts as a magnet for dust.
- Unplug the cable from both the PC and the Meta Quest headset.
- Use a flashlight to inspect the headset’s USB-C port. If you see dust or lint, gently blow it out using a can of compressed air held at a safe 6-inch distance. Never use metal pins or needles to clean the port.
- Inspect the plug ends of your 16-foot Link cable for bent pins, deep scratches, or physical warping.
- Re-insert the cable firmly. Use a Velcro strap to secure the cable to the left side of your headset’s head strap, leaving a small loop of slack between the strap and the port. This prevents the weight of the cable from pulling sideways on the connector when you move your head.
Step 2: Connect Direct to the Motherboard (Time: 5 Minutes)
Many desktop cases feature front-panel USB ports that connect to the motherboard via thin, unshielded internal wires. These internal runs degrade signal quality and often drop power delivery below the required 4.5W to 15W thresholds.
- Locate the rear I/O panel directly on your computer’s motherboard.
- Identify a high-speed port. Look for ports colored blue, red, or teal, or labeled with “SS” (SuperSpeed) or “10G”.
- Plug your Link cable directly into one of these rear motherboard ports. If your cable terminates in USB-C but your motherboard only has high-speed USB-A ports, use a high-quality adapter rated for USB 3.0 speeds.
Step 3: Adjust Windows USB Power Management (Time: 10 Minutes)
Windows has a default feature called “USB Selective Suspend” designed to save electricity by temporarily cutting power to USB ports it deems idle. Unfortunately, this feature often misidentifies active VR headsets and cuts the connection mid-session.
- Right-click the Windows Start button and select Device Manager.
- Scroll down and expand the Universal Serial Bus controllers section.
- Right-click on your primary USB Root Hub (or eXtensible Host Controller) and select Properties.
- Navigate to the Power Management tab and uncheck the box that says “Allow the computer to turn off this device to save power.” Click OK. Repeat this for all listed USB Root Hubs.
- Open the Windows Start menu, type “Edit Power Plan,” and select it. Click on Change advanced power settings.
- Expand USB settings, then USB selective suspend setting, and change it to Disabled. Click Apply and OK.
Step 4: Turn Off Air Link inside the Headset (Time: 5 Minutes)
When wireless Air Link is enabled inside your Meta Quest settings, it actively blocks or disrupts the physical USB Link connection, causing immediate drops or preventing the PC from recognizing the cable altogether.
- Put on your Meta Quest headset and navigate to the Settings menu.
- Select the System category, then click on Quest Link (or Developer settings, depending on your firmware version).
- Locate the Use Air Link toggle and ensure it is turned Off.
- Connect your physical Link cable; you should see a prompt asking to enable Quest Link via the cable connection.
Step 5: Run the Meta Quest Cable Bandwidth Test (Time: 5 Minutes)
The Meta Quest PC app features a built-in diagnostic tool that measures your cable’s actual data transfer speed and connection stability.
- Open the Meta Quest app on your PC.
- Navigate to Devices on the left-hand menu and click on your connected headset.
- Scroll down to the green status section and select USB Cable Test.
- Click Start Test and keep the headset completely still on a flat surface during the process.
- Ensure the results display a green checkmark, indicate a “USB 3” connection, and show a bandwidth speed of at least 1.5 Gbps (ideally between 2.0 Gbps and 2.6 Gbps). If it displays “USB 2” or fails, your cable cannot sustain the connection and must be replaced.
Mistakes to Avoid
- Using Standard Phone Charging Cables: Do not use the white charging cable that came in the box with your headset for PC VR. While it looks identical to a data cable, it is limited to slow USB 2.0 speeds (480 Mbps) and will cause constant connection drops.
- Plugging into Unpowered USB Hubs: Avoid plugging your 16-foot Link cable into cheap, unpowered USB splitters sitting on your desk. A stable Link connection requires a steady 5V/0.9A power supply that only direct motherboard ports or high-quality powered hubs can provide.
- Forgetting Strain Relief: Never let your cable hang straight down from the headset’s port without a Velcro anchor. Over time, the subtle pulling forces of your head movements will bend the internal pins of the USB-C port, leading to permanent connection drops that software updates cannot fix.
- Running Conflicting Overlay Software: Avoid running multiple background capture or overlay programs (like OBS, Discord overlays, or proprietary motherboard boost software) while launching Quest Link, as these can conflict with the Oculus runtime drivers.
How Often
To prevent connection drops before they start, establish a routine maintenance schedule. Clean the headset’s USB-C port with compressed air once every two months to keep household dust and carpet fibers from packing down inside the port. Perform a quick visual check of your cable’s outer jacket weekly; look for sharp kinks or exposed shielding. Additionally, update your computer’s graphics card drivers and the Meta Quest PC application once a month to ensure software protocols remain fully compatible. By keeping up with these simple habits, your VR setup will remain incredibly stable and ready for action well into 2026.
When to Call a Pro or Replace
If you have updated your drivers, disabled power saving, and tried multiple USB ports, but still experience frequent drops, feel the connection plug. If the USB-C connector tip feels excessively hot to the touch or sits loosely inside the headset port with noticeable physical wiggle, the internal port pins are likely damaged. In this case, contact Meta Support for a professional hardware repair or replacement.
However, if the headset port is tight but the cable fails the bandwidth test on multiple computers, the cable itself has failed. Fortunately, replacing a damaged cable is simple and affordable. High-quality alternatives like the Syntech 16FT Link Cable (around $16) or the Syntech 16FT VR Link Cable with USB-C to A Adapter (around $21) provide reliable, long-term replacements that deliver the required speed and durability without the high price tag of the official fiber-optic cord.
FAQ
Why does my Meta Quest Link disconnect whenever I turn my head?
This is almost always caused by physical play inside the headset’s USB-C port. The weight of a hanging 16-foot cable pulls down on the plug, and as you turn your head, the connection briefly breaks. To resolve this, use a Velcro strap to secure the cable firmly to your headset’s side strap, leaving a small loop of slack near the plug to act as a strain relief buffer.
Can I use a USB-C to USB-A adapter for Quest Link?
Yes, but the adapter must be explicitly rated for USB 3.0 (SuperSpeed) or higher, supporting at least 5 Gbps data transfer rates. Using a slow, charging-only USB-A adapter will restrict your connection to USB 2.0 speeds, causing immediate connection drops or preventing Quest Link from launching.
Why is my Quest battery draining while plugged into the Link cable?
Most standard computer motherboard USB-A ports only output 4.5W of power, which is not enough to keep up with the 15W to 18W power consumption of the Meta Quest during active play. While the cable will transmit data perfectly, your battery will slowly drain over a 3 to 5-hour session rather than charge.
What speed does my Link cable need to show in the Oculus app test?
For a reliable, stutter-free connection, the built-in Oculus cable test should report a speed of at least 1.5 Gbps, with 2.0 Gbps to 2.4 Gbps being the ideal range. If your test drops below 1.0 Gbps or registers as USB 2.0, the connection is highly unstable and prone to dropping.
Related guides
- Best Free MMOs on Steam: Subscription Limits, Pay-to-Win and Time Cost (2026)
- Best Free Horror Games on Steam: How to Pick One That Fits Your PC and Your Nerves (2026)
- Black Frame Insertion vs VRR: Which Smoothness Feature Should You Use?
- Best Webcams for Streaming: 11 Listings Compared by Resolution, Focus and Light (2026)