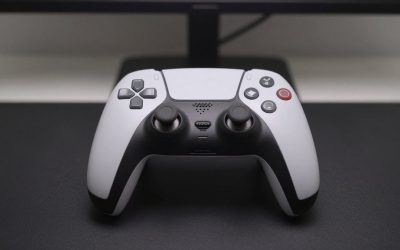
Gamers know the frustrating feeling of a worn-out thumbstick. Over hours of intense gameplay, the once-grippy rubber texture of your PS5 DualSense controller wears down to smooth, slippery plastic, or worse, begins to tear and peel away entirely. When your thumbs start slipping off the sticks during a crucial match, it is time for an upgrade. However, attempting this fix without the proper guidance can quickly turn a simple cosmetic repair into an expensive disaster.
The Sony DualSense is a highly sophisticated piece of hardware, weighing approximately 280 grams (9.9 ounces) and packed with delicate haptic feedback motors, adaptive triggers, and fragile ribbon cables. If you go about replacing the analog stick caps poorly—such as using the wrong tools or applying brute force—you risk stripping the tiny internal screws, snapping the delicate plastic clips holding the outer shell together, or tearing the internal connections. A botched repair can easily transform your $70 to $80 controller into a useless paperweight. This step-by-step guide will walk you through the process safely, ensuring your controller looks and feels brand new without damaging its sensitive internal components.
As an Amazon Associate we earn from qualifying purchases at no extra cost to you.


What You Need
Before you begin, gather the correct tools. Working with precision electronics requires specialized equipment to prevent damage to the plastic housing and internal circuit boards.
| Item | Why You Need It | Optional? |
|---|---|---|
| Replacement Analog Stick Caps | These are the physical plastic and rubber stems that replace your worn-out sticks. | No (unless using slip-on grips) |
| Plastic Pry Tool (Spudger) | Safely pops off the delicate black faceplate and outer shell without scratching the plastic. | No |
| Phillips #00 Precision Screwdriver | Fits the tiny 1.5mm screws securing the internal controller chassis. | No |
| Tweezers (Precision ESD-safe) | Helpful for disconnecting the battery plug and handling small ribbon cables. | Yes |
| Slip-On Grip Caps (e.g., NEWDERY Caps) | An alternative, non-invasive solution that slips directly over slightly worn existing sticks. Price ranges from around $8 to around $9. | Yes |
Step-by-Step
Replacing the physical analog stick caps requires opening the controller shell. Follow these steps carefully, taking your time with each stage.
Step 1: Power Down and Prepare Your Workspace (Time Estimate: 2 minutes)
Ensure your PS5 controller is completely powered off and disconnected from any charging cables or console connections. Clear a flat, clean, well-lit workspace. Lay down a soft microfiber cloth or a silicone work mat to protect the controller faceplate from scratches and to prevent the tiny screws from rolling away.
Step 2: Remove the Black Decorative Accent Trim (Time Estimate: 4 minutes)
The black plastic trim surrounding the analog sticks must be removed first. Take your thin plastic pry tool and insert it into the thin seam at the very bottom of the controller’s “legs” (near the headphone jack). Gently pry upward to release the plastic clips. Slide the tool slowly along the outer edges of the black trim, popping the clips as you go. Once the lower portion is loose, gently pull the trim down and away from the controller body to slide the top tabs out of their slots. Set the trim aside safely.
Step 3: Pop Off the L1 and R1 Shoulder Buttons (Time Estimate: 3 minutes)
To access the upper screws holding the controller shell together, you must temporarily remove the L1 and R1 buttons. Insert your plastic pry tool into the gap between the L1 button and the L2 trigger. Gently apply upward leverage until the button pops off its plastic hinge. Repeat the exact same process for the R1 button. Be careful not to lose the tiny metal tension springs located beneath these buttons if they happen to dislodge.
Step 4: Extract the Four Chassis Screws (Time Estimate: 5 minutes)
With the trim and shoulder buttons removed, you will now see four small Phillips-head screws. Two screws are located in the cavities beneath the L1 and R1 buttons, and two are located at the bottom ends of the controller grips where the black trim was snapped in. Using your Phillips #00 precision screwdriver, carefully remove all four screws. Keep them organized in a small tray, as they are incredibly easy to lose.
Step 5: Release the Shell Clips and Open the Controller (Time Estimate: 5 minutes)
This is the most delicate part of the teardown. Near the bottom of the controller’s grips, you will find two small plastic locking tabs. Use your pry tool or a pair of tweezers to gently push these tabs inward while pulling the back shell away from the front faceplate. Once those tabs release, slide your pry tool along the side seams of the controller to pop the remaining internal side clips. Slowly lift the back plate off the controller, taking care not to pull too quickly, as the battery bracket is nestled inside.
Step 6: Swap the Analog Stick Caps (Time Estimate: 3 minutes)
Once the back shell is off, you will see the battery and the main circuit board. You do not need to completely disassemble the motherboard to change the sticks. Carefully pull the old analog stick caps straight up and off their metal joystick shafts. They should slide off with moderate resistance. Take your new replacement caps, align the molded groove inside the cap with the flat side of the metal joystick shaft, and press them firmly downward until they sit flush against the base.
Step 7: Reassemble and Test Your Controller (Time Estimate: 5 minutes)
Align the back shell with the front faceplate and gently squeeze them together until you hear the side clips snap back into place. Reinstall the four screws using your Phillips #00 screwdriver, ensuring they are snug but not overtightened. Snap the L1 and R1 buttons back onto their hinges, and slide the black decorative accent trim back into position, starting from the top and pressing down along the legs until everything is flush. Turn on your console and test the stick movement in your console settings or a game to ensure full range of motion.
Mistakes to Avoid
Avoid these common pitfalls to ensure your repair goes smoothly without causing permanent damage to your DualSense controller:
- Using Metal Pry Tools: Never use metal screwdrivers or metal knives to pry open the plastic outer shell. Metal will easily gouge, scratch, and deform the soft plastic casing of your controller.
- Stripping the Screws: The four chassis screws are small and soft. Always use a high-quality Phillips #00 screwdriver and apply firm, downward pressure while turning to prevent the tool from slipping and rounding out the screw head.
- Forcing the Ribbon Cables: If you choose to remove the motherboard for a deeper cleaning, never yank on the thin, paper-like ribbon cables. Always release their locking collars first and pull them gently using precision tweezers.
- Ignoring the L1/R1 Springs: When popping off the shoulder buttons, keep a close eye on the microscopic springs underneath. If these fly out and get lost, your shoulder buttons will lose their tactile rebound and feel completely mushy.
How Often Should You Replace Stick Caps?
The lifespan of your analog stick caps depends entirely on your gaming habits. Casual players who game a few hours a week may find that their original thumbsticks last for years without showing significant wear. However, competitive gamers who play intensive action, sports, or fighting games may need to address their sticks every 12 to 18 months as the rubber texture naturally degrades under high friction.
As we look ahead to gaming setups in 2026, keeping your existing hardware in peak condition is both eco-friendly and cost-effective. If you want to avoid taking your controller apart entirely, utilizing external protective slip-on caps is an excellent preventative measure. Products like the NEWDERY Joystick Replacement Grip Caps (ranging in price from around $8 to around $9) can be slipped over slightly worn or brand-new sticks to preserve the underlying rubber and extend the life of your controller indefinitely.
When to Call a Pro or Replace the Controller
While replacing worn-out rubber caps is a straightforward cosmetic fix, some joystick issues cannot be resolved by simply swapping the plastic toppers. If your controller is experiencing severe “stick drift”—where your on-screen character or camera moves on its own even when you are not touching the controller—the issue lies deep within the analog stick’s internal potentiometer sensors.
Fixing stick drift typically requires desoldering the old sensor module from the motherboard and soldering on a new one. If you do not have experience with a soldering iron, attempting this can easily melt the circuit board. In these instances, or if your controller’s internal plastic clips have completely snapped, it is best to send the controller to a professional electronics repair shop or replace the DualSense controller entirely to ensure peak performance.
FAQ
Can I replace the analog stick caps without opening the controller?
You cannot replace the internal plastic stem caps without opening the shell. However, if your original sticks are only slightly worn, you can use slip-on silicone grip caps, such as the NEWDERY Joystick Replacement Grip Caps (around $8 – around $9), which stretch directly over the existing thumbsticks without any teardown required.
Will opening my PS5 controller void my warranty?
In many regions, including the United States, opening your controller for basic repairs and cosmetic maintenance does not automatically void your warranty, thanks to consumer protection laws. However, if you cause physical damage to the internal motherboard or break internal components during the disassembly process, Sony will not cover those damages under warranty.
Can I use PS4 analog stick caps on a PS5 controller?
Yes, the internal mounting shafts for the DualShock 4 (PS4) and DualSense (PS5) analog sticks are identical in size and shape. You can physically install PS4 stick caps onto a PS5 controller, though the outer plastic height and dome shape may differ slightly, which could marginally alter the ergonomic feel of your controller.
How do I clean the analog stick area while I have the controller open?
With the shell open, use a cotton swab lightly dipped in 90% or higher isopropyl alcohol to clean any accumulated dirt, skin oils, and dust from around the joystick housing. Allow the alcohol to dry completely (which takes about 30 seconds) before reassembling the plastic shell.
Related guides
- Best Free MMOs on Steam: Subscription Limits, Pay-to-Win and Time Cost (2026)
- Best Free Horror Games on Steam: How to Pick One That Fits Your PC and Your Nerves (2026)
- Black Frame Insertion vs VRR: Which Smoothness Feature Should You Use?
- Best Webcams for Streaming: 11 Listings Compared by Resolution, Focus and Light (2026)