A wall-mounted game console can free up floor space, improve cable organization, and keep a media setup looking cleaner. Done badly, though, it can lead to a fallen console, stripped drywall, damaged ports, blocked ventilation, or a power cord pulled loose by a child or pet. The safest installation starts with choosing a mount rated for the console’s actual weight, fastening it into solid structure whenever possible, and leaving enough airflow around the device.
Most current consoles weigh roughly 4 to 15 pounds before cables and accessories, but the mount must also handle the leverage created when the unit sits away from the wall. Check the console manufacturer’s clearance guidance first. As a practical baseline, leave at least 4 inches of open space around side and rear vents, and never enclose a console in a tight cabinet unless that cabinet is specifically designed for electronics. In 2026, many wall shelves and device brackets include cable-routing features, but good cable management should never come at the expense of ventilation or easy access to power.
As an Amazon Associate we earn from qualifying purchases at no extra cost to you.


Our Top Picks

What You Need
| Item | Why | Optional? |
|---|---|---|
| Console-specific wall mount or wall shelf | Supports the console securely and keeps it off furniture or the floor | No |
| Stud finder | Locates wood studs or helps identify safer mounting locations | Strongly recommended |
| Level | Keeps the mount straight and helps distribute weight evenly | No |
| Tape measure and pencil | Sets a usable viewing height and marks hole locations | No |
| Drill and appropriate drill bits | Creates pilot holes for screws or anchor holes in drywall | No |
| Mounting screws and washers | Secure the bracket or shelf to the wall framing | No; use supplied hardware only if it suits your wall |
| Drywall anchors rated for the load | Provides support when a stud is unavailable | Only if mounting outside studs |
| Power drill driver or screwdriver | Drives fasteners without overtightening them | No |
| Cable sleeves, clips, or raceway | Reduces cable strain and keeps cords away from feet and pets | Yes |
| Surge protector | Protects connected electronics and provides organized outlets | Recommended |
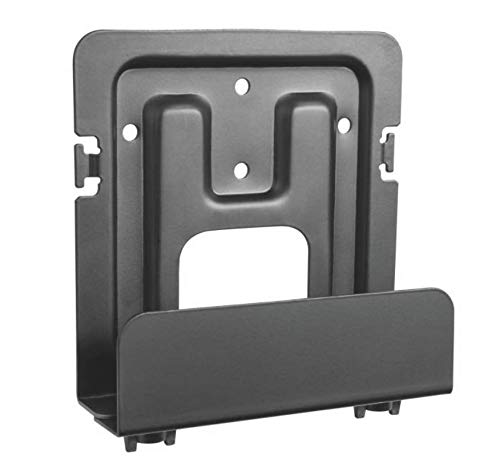
For a compact cable box, modem, streaming device, or smaller console, an adjustable bracket such as the Mount Plus MP-06-02 can be a budget-friendly option; it is typically around $17. For a larger gaming console, a tempered-glass media shelf with a steel frame, such as the Mount-It! floating shelf rated for up to 22 pounds, is generally around $29. Confirm both the product’s load rating and its listed compatibility before buying. A shelf is often the safer choice for a large, unusually shaped, or vertically oriented console because it supports the base rather than relying on side brackets.
Step-by-Step
1. Choose the right location and mounting style (15–20 minutes)
Pick a wall location close enough to the TV that HDMI and power cables can reach without being stretched. Measure your cables first. Standard HDMI cables are often 6 to 10 feet long, but a longer certified cable may be needed for a clean route.
Keep the console away from radiators, fireplaces, direct sun, HVAC vents, and areas that get splashed or damp. Avoid mounting directly above a heat source. For comfortable access, place the console shelf or bracket around 18 to 48 inches above the floor, depending on furniture placement and cable routing. If you have young children, choose a higher location that remains easy for an adult to access.
Decide whether a bracket or shelf suits the console. Use a console-specific bracket only when the manufacturer confirms compatibility. Use a shelf for devices with wide bases, fragile exterior panels, or uncertain mounting points.
2. Check the console, mount, and wall weight limits (10 minutes)
Find the console’s weight in its manual or official specifications, then add the weight of any external drive, charging dock, or accessory that will sit on the shelf. Choose a mount with a stated capacity comfortably above that total. For example, a 10-pound console should not be placed on a 10-pound-rated shelf; look for a capacity of at least 15 to 20 pounds.
Next, identify the wall material. Wood studs provide the most dependable attachment. Metal studs, hollow drywall, plaster, concrete, and masonry each require different fasteners. Do not assume the screws packaged with a mount are appropriate for every wall type.
3. Locate studs and inspect for hazards (10–15 minutes)
Use a stud finder to locate framing members, which are commonly spaced 16 inches on center, though 24-inch spacing also exists. Mark each stud edge, then mark the center. Confirm the reading by scanning several inches above and below your intended screw location.
Before drilling, check for nearby outlets, switches, plumbing fixtures, and wall-mounted equipment. Wiring often runs vertically or horizontally from electrical boxes. If you are unsure what is behind the wall, move the mount location or contact a professional. Never drill blindly into a wall near an outlet.
4. Mark the bracket or shelf holes (10 minutes)
Hold the wall plate or shelf bracket in position. Set a level across it and adjust until the bubble is centered. Mark every mounting hole with a pencil. For the strongest installation, align at least two fasteners with a wood stud.
Make sure the console will have clearance after installation. Account for power plugs, HDMI connectors, Ethernet cables, and any cable that protrudes straight from the rear. A console mounted too close to the wall can bend connectors or pinch cords.
5. Drill pilot holes or install the correct anchors (15–20 minutes)
For wood studs, drill pilot holes slightly smaller than the screw shank. This reduces the chance of splitting wood and makes the screws easier to drive. Most wall-mount screws are between 1 1/2 and 3 inches long, but use the mount manufacturer’s instructions and avoid screws so long that they create unnecessary risk behind the wall.
When no stud is available, use anchors specifically rated for the finished load and wall type. Toggle-style anchors generally provide more holding strength in hollow drywall than basic plastic expansion anchors, but they require larger holes and clearance behind the wall. Never use lightweight picture-hanging hardware for a console shelf or media bracket.
6. Fasten the mount securely (10–15 minutes)
Hold the mount in place, insert the screws, and tighten them evenly. Do not overtighten: a screw that spins freely, crushes drywall, or pulls the bracket inward is not secure. With shelves that use multiple brackets, attach each bracket before setting the shelf surface in place.
After fastening, pull gently downward and outward on the mount. There should be no rocking, clicking, wall movement, or gap between the mount and wall. If anything shifts, remove the hardware and correct the issue before adding the console.
7. Place the console, manage cables, and test airflow (15–20 minutes)
With the console powered off and unplugged, place it on the shelf or secure it in the bracket according to the mount instructions. Install any safety straps, retaining bars, or anti-slip pads included with the mount. Do not use adhesive alone as the primary support for a console.
Route cables with clips or a raceway, leaving a small service loop—about 3 to 6 inches—so plugs are not under tension. Keep power cords accessible, avoid tightly coiling them, and do not run them under rugs. Connect the console to a properly rated surge protector rather than overloading a single outlet.
Turn the console on and run it for 30 to 60 minutes. Check that exhaust air can escape freely and that the shelf remains stable. Recheck the screws after the first day of use.
Mistakes to Avoid
- Mounting into drywall with ordinary plastic anchors: They may be fine for light décor but are not a dependable choice for a heavy console and shelf.
- Ignoring ventilation: A shelf that looks tidy but blocks intake or exhaust vents can cause overheating and noisy fans.
- Using a mount at its exact maximum rating: Leave a meaningful safety margin for the console, cables, and incidental force.
- Hiding a power strip inside a sealed space: Power supplies and plugs need airflow and should remain accessible.
- Pulling HDMI or power cables taut: Tight cables can damage ports or pull a console off balance.
- Mounting where children can grab cables: Even a secure bracket can be stressed by repeated pulling.
- Skipping the level: An uneven shelf can make a console slide, especially on glass surfaces.
How Often
Inspect a wall-mounted console one month after installation, then every six months. Check that screws remain tight, anchors have not shifted, and the wall surface shows no cracking, bulging, or discoloration. Dust console vents every one to three months, especially in homes with pets. Also inspect cables whenever you rearrange furniture or add a new device.
When to Call a Pro or Replace
Call a qualified installer, electrician, or handyman if you need to mount on tile, stone, concrete, plaster with unknown backing, metal studs, or a wall that may contain wiring or plumbing. Professional help is also wise for a shelf holding more than 20 pounds, a mount installed above a fireplace, or a setup requiring in-wall cable routing.
Replace the mount immediately if it bends, develops rust, loses a retaining piece, has cracked glass, or begins to move under the console’s weight. Replace damaged anchors rather than driving larger screws into a compromised hole. If the wall itself is soft, cracked, water-damaged, or crumbling, repair the wall before reinstalling anything.
FAQ
Can I mount a game console directly to drywall?
You can, but it is not the preferred method. For a heavier console or shelf, fasten into at least one wood stud whenever possible. If studs are unavailable, use load-rated toggle anchors appropriate for the wall and keep the total load well below the anchor manufacturer’s stated limit.
How much space should I leave around a wall-mounted console?
Leave at least 4 inches around the rear and side vents unless your console’s manufacturer specifies more. Do not place the console inside a closed cubby, directly against curtains, or beneath a shelf that traps rising heat.
Is a floating shelf safer than a console bracket?
Often, yes, for larger or irregularly shaped consoles. A properly installed shelf supports the device from below and can accommodate changing console designs. A console-specific bracket can also be safe when it is designed for your exact model and fastened to suitable wall structure.
Can I mount the console behind the TV?
Only if there is enough clearance for ventilation, cable bends, and access to buttons and ports. Behind-TV installations can become hot quickly, especially with slim wall mounts. Measure the gap before installing, and avoid the location if the console’s exhaust would blow directly into the TV or wall.
Related guides
- Best Free MMOs on Steam: Subscription Limits, Pay-to-Win and Time Cost (2026)
- Best Free Horror Games on Steam: How to Pick One That Fits Your PC and Your Nerves (2026)
- Black Frame Insertion vs VRR: Which Smoothness Feature Should You Use?
- Best Webcams for Streaming: 11 Listings Compared by Resolution, Focus and Light (2026)